Approve, Authenticate OTP, and Biometrics Using RSA Authenticator for Windows
The RSA Authenticator for Windows helps you access your organization's protected resources by providing multifactor authentication with Approve (push notifications), Authenticate OTP, and Biometrics. The app icon looks like this in the Microsoft Store:
![]()
The following table describes the differences in the terminologies used in the app versions.
| RSA SecurID Authenticate 3.6.0 App | RSA Authenticator 6.0.1 and Later | |
|---|---|---|
| Application name | RSA SecurID Authenticate | SecurID Authenticator/RSA Authenticator |
| User interface labels, messages, and values | Company ID | Organization ID |
| Account | Credential | |
| Authenticate Tokencode | CAS OTP/Authenticate OTP | |
| Pull down to check for authentication | Click to refresh authentication | |
| Register | Add Credential | |
| View Tokencode | View OTP |
Get Started with RSA Authenticator for Windows
Troubleshooting Common Problems
Get Started with RSA Authenticator for Windows
You need a Windows computer to download and install RSA Authenticator for Windows.
Before you begin
-
You need a Windows computer.
-
Your administrator sends you a new Registration Code, Email Address, and Organization ID for each credential.
Procedure
-
Download the latest RSA Authenticator from Microsoft Store. Search for RSA Authenticator, which looks like this:

-
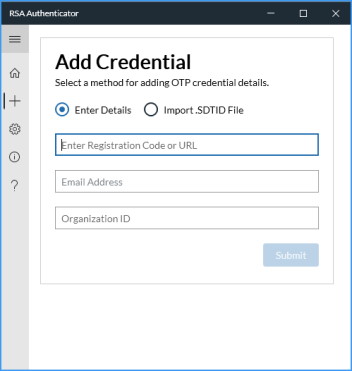
Open the app and click Add Credential
 .
. -
Follow the prompts to add a credential.
If you want to add more credentials, click Add Credential and then follow the prompts. You need a new Registration Code, Email Address, and Organization ID for each credential.
Sign in to Applications
Use SecurID Authenticator when you access your organization's protected resources.
Enable SecurID Authenticator Notification on Your Windows Computer
You must respond to notifications during authentication with Approve or Biometrics. Make sure notifications are enabled on your Windows computer so you can take advantage of these options. If necessary, click the notification or the app icon to continue. If you have disabled or not received notifications, click the Refresh icon at the top of the SecurID Authenticator app.
Different Ways to Sign In
Your administrator determines which authentication options you can use.
| Authentication Option | How to Use This Option |
|---|---|
|
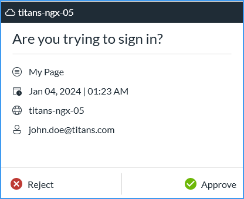
Approve Push Notification
|
RSA sends a notification to your Windows computer.
|
|
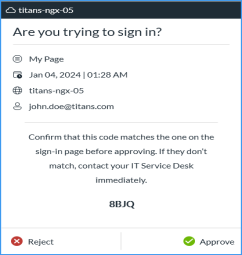
Approve Push Notification with Visual Code Matching
|
If the Code Matching has been enabled by the administrator, you need to use a code to approve your notification. Based on the method configured by the administrator, you can approve the push notification in one of the following ways:
|
|
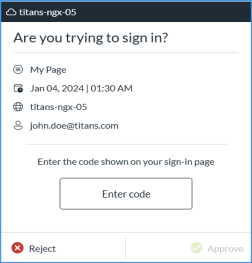
Approve Push Notification with Input Code Matching
|
|
Approve Push Notification with Selection Code Matching
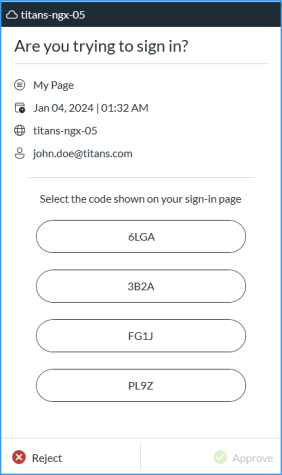
|
|
|
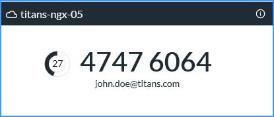
Authenticate OTP Credential
|
In your browser or VPN, enter the Authenticate OTP that appears on the app home screen. The credential name appears on the credential card. The Authenticate OTP is an eight-digit number that changes every 60 seconds. If you are using the app and accessing the protected application on the same Windows computer, you can click the OTP to copy it. Your administrator may require additional authentication (for example, a PIN) before viewing the Authenticate OTP. The app prompts you to create a PIN that is only used for viewing the Authenticate OTP. When you need to enter the OTP in the browser or VPN, click View OTP on the app and follow the instructions. Tip: Click the Authenticate OTP to copy it. |
|
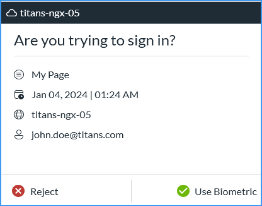
Biometrics Push Notification
|
RSA sends a notification to your Windows computer.
|
Approve Push Notification with Visual Code Matching
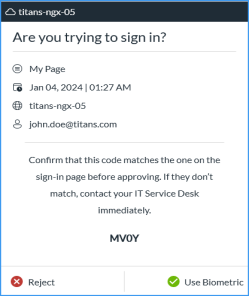
|
If Code Matching has been enabled by the administrator, you need to use a code to continue with Biometrics Authentication. Based on the method configured by the administrator, you can continue with Biometrics Authentication in one of the following ways:
|
Approve Push Notification with Input Code Matching
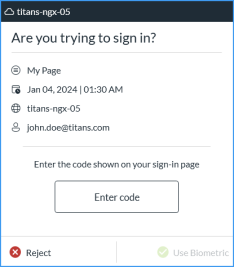
|
|
Approve Push Notification with Selection Code Matching
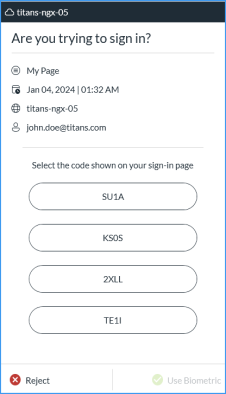
|
|
|
Windows Hello Sign-in
|
After clicking Use Biometric (Considering Code Match Validation), the App prompts you to authenticate using a biometric option available on your Windows computer. Ensure setting up the biometric on your Windows computer. If your Windows computer does not meet the minimum system requirements, you will not be able to use this method. |

When you sign in to an application, you can select Remember This Browser in the browser to simplify future authentication.
Add a Credential
You can add multiple credentials to a single Windows computer for the same organization. Each credential must use a different username. For example, you can register a Windows computer with Organization A, then add credentials using username1@example.com for Credential 1 and username2@example.com for Credential 2. Or you can add credentials for the same organization to different Windows computer, using a different username for each credential. The credentials can use different apps or the same app.
You can add up to ten credentials in RSA Authenticator. Your administrator must send you a new Registration Code for each credential.
-
Open RSA Authenticator.
-
Click Add Credential
. -
Select Enter Details and then enter the following:
-
Registration code
-
Email Address
-
Organization ID
-
-
Click Submit.
A success message is displayed.
-
Click OK.
If the credential registration is successful, the credential is added to the home page.
Note: After registration, if the credential displays View OTP, click View OTP and create a PIN to view the OTP.
Manage Authenticate OTP Credential
If the CAS admin enabled the PIN protection for Authenticate OTP credentials, you must set a PIN to view the OTP.
Set Authenticate OTP PIN
RSA Authenticator for Windows supports setting a PIN for an Authenticate OTP credential.
Procedure
-
Click View OTP.
A Set Pin dialog appears to set a PIN for the Authenticate OTP credential.
-
Enter a PIN in the Enter PIN and Confirm PIN fields.
-
Click Submit.
Note: The PIN must comply with the CAS PIN policy.
On successful submission of PIN, Authenticate OTP is displayed.
Change Authenticate OTP PIN
Use the following instructions to change an existing Authenticate OTP PIN.
Procedure
-
Click View OTP.
-
In the Enter PIN field, click Change PIN.
-
In the Old PIN field, enter the existing PIN.
-
In the New PIN field, enter a new PIN.
-
In the Confirm PIN field, reenter the new PIN, and click Submit.
Note: When there is a change in the PIN policy, the CAS server admin can change the minimum required PIN length and notify you to change the PIN your Authenticate OTP credentials.
View Authenticate OTP
Use the following instructions to view Authenticate OTP.
Procedure
-
Click View OTP.
-
Enter the PIN that you had set.
-
Click Submit.
An Authenticate OTP will be displayed for 4 mins.
Reset Authenticate OTP PIN
If you forgot your PIN or locked your Authenticate OTP credential, you need to delete and reregister all Authenticate OTP credentials that require a PIN.
Note: An Authenticate OTP credential will get locked if you enter an incorrect PIN 5 times.
Rename a Credential Card
If you have multiple credential cards with the default name, it might be difficult to identify each credential. For easy identification, you can rename your credential cards.
Note: To rename a credential, you require the edit permission from your administrator.
-
From RSA Authenticator, select a credential card.
-
Click Edit
 .
. -
Rename the card.
-
Click the Save
 to save the name.
 -
If prompted, enter the device password.
-
Click OK.
View Credential Card Information
-
Click Info
 to view the card information.
 -
The Authenticate OTP credential displays the Credential Name and the Organization ID.
Delete a Credential
You can delete a credential only if you have the delete permission.
-
From RSA Authenticator, select a credential card.
-
Click Delete
 .
. -
If prompted, enter the device password.
-
Click OK.
Send Logs for Troubleshooting
RSA Authenticator creates log files that are used to diagnose problems. Send log files to your administrator or IT Help Desk if they request for the log files.
Procedure
-
Open RSA Authenticator.
-
Click About and then click Export Logs.
-
Save the log file at your desired location.
-
Send the logs to your administrator or IT Help Desk.
Troubleshooting Common Problems
Enable RSA Authenticator Notification on Your Windows Computer
Issue: Did not receive any push notification on windows computer.
Workaround: Make sure you have enabled notifications on your Windows computer. If necessary, click the notification or the app icon to continue. If you have disabled or not received notifications, click the Refresh icon at the top of the RSA Authenticator app to refresh.