AM OTP Credential for RSA Authenticator for Windows
An RSA OTP credential helps you safely sign in to your organization's protected resources by using a PIN (something you know) and an RSAOTP (something you have). Use your RSA OTP credential with RSA Authenticator, which is represented by this icon in the Microsoft Store:

The following table describes the differences in the terminologies used in the app versions.
| RSA SecurID Software Token 5.x | RSA Authenticator 6.0.1 and Later | |
|---|---|---|
| Application name | RSA SecurID Software Token | SecurID Authenticator/RSA Authenticator |
| User interface labels, messages, and values | Tokencode | AM OTP/SecurID OTP |
| Token | AM OTP Credential/SecurID OTP Credentials | |
| Import Token | Add Credential | |
| Next Code | Next OTP | |
| Device Serial Number | Binding ID |
Get Started with RSA Authenticator for Windows
Set a PIN for SecurID OTP Credential
Troubleshooting Common Problems
Get Started with RSA Authenticator for Windows
You need a Windows computer to download and install RSA Authenticator for Windows.
Procedure
-
Download the latest RSA Authenticator from the Microsoft Store. Search for RSA Authenticator, which looks like this:
-
Open the app and click Add Credential
 .
. -
Add a SecurID OTP credential by importing or entering the details provided by your administrator.
Add a SecurID OTP Credential
Your administrator sends you either a URL or SDTID file attached in an email for adding an SecurID OTP credential. You can add up to 25 SecurID OTP credentials. Following are the different ways to add SecurID OTP credentials:
Import a SecurID OTP Credential Using the CT-KIP URL
If the administrator has provisioned a SecurID OTP credential using CT-KIP URL, import the credential to RSA Authenticator as follows:
-
From RSA Authenticator, click Add Credential
. -
Select Enter Details.
-
In the Enter Registration Code or URL field, enter the CT-KIP URL.
-
Click Submit.
-
If prompted, enter the activation code that you have received from your administrator.
-
Click Submit.
-
If prompted for a certificate, either install a root CA certificate of Authentication Manager or accept the server certificate to proceed.
-
A success message is displayed. Click Ok.
The credential is added to the Home page.
Import a SecurID OTP Credential from a CT-KIP URL in an Email
If your administrator had sent CT-KIP URL in an email, import the SecurID OTP credential as follows:
-
Open the email and then click the URL.
The RSA Authenticator is started automatically. -
If prompted for an activation code, enter the activation code received in the email.
The credential is added to the Home page.
Import a SecurID OTP Credential from a SDTID File
If you have received a .SDTID file from your administrator and have stored it on your local machine, do as follows:
-
From RSA Authenticator, click Add Credential
. -
Select Import .SDTID File.
-
Do one of the following:
-
Drag and drop the .SDTID file provided to you.
-
Click Choose File, browse to the location and then select the .SDTID file.
-
-
Click Import.
Note: If the file is protected with an import password, enter the password to complete the import.
-
A success message is displayed. Click Ok.
Note: After the SecurID OTP is imported, the app deletes the SDTID file from your local machine.
Import a SecurID OTP Credential from SDTID File from an Email Attachment or Locally Stored File
If your administrator has sent you the SDTID file as an email attachment, import the SecurID OTP credential as follows:
-
Open the email and then double-click the file attachment. For example, “token1.sdtid.”
Note: If the attachment is zipped, extract the SDTID file and then double-click the file.
-
The RSA Authenticator detects the .SDTID file and starts up automatically.
-
If prompted to select an application to open the file, select RSA Authenticator.
-
If prompted, enter the file password, and then click OK.
A success message is displayed. -
Click OK.
The credential is added to the Home page.
Import a SecurID OTP Credential from Non-Default Directory
If you have received a SDTID file from your administrator and have stored it on your local machine which is a non-default directory, do as follows:
-
Double-click the file attachment. For example, “token1.sdtid.”
Note: If the attachment is zipped, extract the SDTID file and then double-click the file.
-
The RSA Authenticator detects the .SDTID file and starts up automatically.
-
If prompted to select an application to open the file, select RSA Authenticator.
-
If prompted, enter the file password, and then click OK.
A success message is displayed.
-
Click OK.
The credential is added to the Home page.
Import a SecurID OTP Credential Automatically from a Default Directory
If you have received a .SDTID file as an attachment, save it to a default directory. If the attachment is zipped, extract the SDTID file first and then save it to the default directory. The default directories are the Desktop or Documents folders on your computer. If the .SDTID files are available in a default directory, RSA Authenticator can automatically import your OTP credential when you open the app. The application then deletes the file on successful import of SecurID OTP Credential, as long as the file is not marked read-only or otherwise protected.
Note: If your administrator had used a deployment tool to push the file to one of the default directories, the OTP is imported automatically the next time you start the application.
-
Save the SDTID file attachment to one of the default directories.
-
Open RSA Authenticator.
The app detects the SDTID file and imports the OTP credentials automatically. If you have multiple SDTID files, the app imports the credentials one by one. -
If prompted, enter the file password and then click OK.
A success message is displayed. -
Click OK.
Migrate Existing SecurID OTP Credentials from RSA SecurID Software Token 5.0 to RSA Authenticator 6.x
On the first launch of the app, your existing SecurID OTP credentials in the RSA SecurID Software Token 5.0 are automatically migrated to RSA Authenticator 6.x. During migration, if prompted, enter your current device password to complete the migration. All your SecurID OTP Credentials are migrated until the RSA Authenticator reaches the maximum limit of 25 credentials for SecurID OTP credentials. The 25 includes both the already existing SecurID credentials and the credentials migrated from RSA SecurID Software Token 5.0. After reaching the maximum, if you want to add any, you need to delete an existing SecurID credential and then add a credential.
Note: On every launch, RSA Authenticator attempts to migrate any new or unmigrated SecurID OTP credentials present in RSA SecurID Software Token 5.0.
Note: From 6.2 onwards, RSA Authenticator supports Migration of RSA SecurID Software Tokens with Automation as well, provided, they are not having SINGLEDATABASE enabled.
Set a PIN for SecurID OTP Credential
Your administrator tells you if you need to set a PIN immediately after importing a SecurID OTP credential. These instructions are a general guide. Your IT Help Desk will provide specific information if necessary.
You must reset your PIN if you forget it or it becomes compromised. Use the reset method provided by your IT Help Desk.
-
On your Microsoft Windows computer, connect to your VPN client or protected application. Enter your username. Leave the dialog box open.
-
Open RSA Authenticator.
-
If your app displays Enter PIN, perform these steps. If you do not see Enter PIN, go to step 4.
-
Leave the PIN field blank and click Submit to view the OTP.
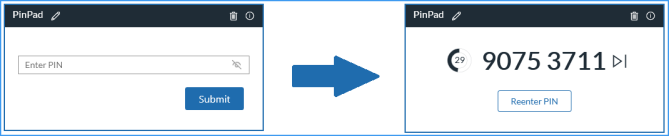
-
On your Windows computer, in the Passcode field, type the SecurID OTP, without spaces, and click OK.
-
When prompted, enter a PIN that contains 4 to 8 numeric digits. It cannot begin with zero. Memorize the PIN.
-
Confirm the PIN.
You are prompted for a passcode.
-
In the app, return to the Enter PIN screen.
-
Enter the PIN you just created and click Submit.
The OTP appears. This code combines the PIN and SecurID OTP.
-
Go to the VPN client or application sign-in screen. In the Passcode field, type the passcode without spaces. Click OK.
After you set the PIN, you are ready to Sign In to Applications.
-
-
Use this method only if you did not perform step 3.
-
In the VPN client or protected resource screen, enter your username.
-
In the Passcode field, enter the OTP that is displayed in the app, without spaces, and click OK.
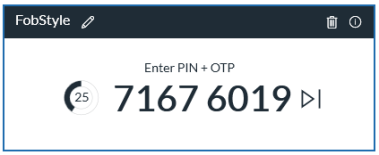
OTP displayed in app:
-
When prompted, create a PIN that contains 4 to 8 digits. It cannot begin with a zero. Memorize the PIN.
-
Enter and confirm the PIN.
You are prompted for a passcode.
-
In the app, click Next OTP.
An OTP appears.
-
On your Windows computer, in the Passcode field, first enter your PIN, and then enter the OTP in the same field, without spaces.
- Click OK.
After you set the PIN, you are ready Sign In to Applications.
Sign In to Applications
Use your SecurID OTP credentials to sign in to applications such as a VPN client.
Tip: You can click the SecurID OTP to copy it to an application on the same Windows computer.
-
On your Windows computer, open the VPN client or application.
-
Enter your username. Leave the sign-in screen open.
-
Open RSA Authenticator.
-
Follow the steps that correspond to your app display.
If your app displays Enter PIN:
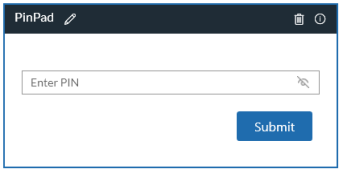
-
Enter your PIN and then click Submit to see the OTP.
-
In the VPN client or application window, enter the OTP, without spaces.
-
Click OK
If your app looks like this:
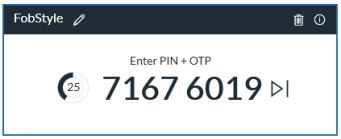
-
Enter one of the following in the VPN client or application window:
-
If you have a PIN, enter the PIN followed by the SecurID OTP without spaces.
-
If you do not need a PIN, enter only the SecurID OTP, without spaces.
-
-
Click OK.
-
-
View OTP from AM Credentials
If Device Password is set by user in "Settings" page, then after opening of the application if user has not given Device Password even once, then SecurID OTP credential views are hidden with button saying "View OTP".
-
Open RSA Authenticator.
The Home page displays all your credentials.
-
If the Device Password is enabled, click View OTP.
-
Enter the device password and then click Submit.
The credential card displays the OTP.
-
Do the following if necessary:
-
To copy an OTP, click the OTP. When you click an OTP to copy, a Copied message appears to confirm.
-
To obtain the next SecurID OTP (applicable only for AM credentials), click Next OTP.
-
Rename a Credential Card
If you have multiple credential cards with the default name, it might be difficult to identify each credential. For easy identification, you can rename your credential cards.
Note: To rename an SecurID OTP credential, you require edit permission from your administrator.
-
From RSA Authenticator, select a credential card.
-
Click Edit
 .
. -
Rename the card.
-
Click Save
 to save the name.
 -
If prompted, enter the device password.
-
Click OK.
View Credential Card Information
-
Click Info
 to view the card information.
 -
The AM OTP credential displays the following details: Credential Name, Serial Number, and Expiration Date.
Delete a Credential
You can delete an SecurID OTP credential only if you have the delete permission.
-
From RSA Authenticator, select a credential card.
-
Click Delete
 .
. -
If prompted, enter the device password.
-
Click OK.
Send Logs for Troubleshooting
The RSA Authenticator creates log files that are used to diagnose problems. Send log files to your administrator or IT Help Desk if they request for the log files.
Procedure
-
Open RSA Authenticator.
-
Click About and then click Export Logs.
-
Save the log file at your desired location.
-
Send the logs to your administrator or IT Help Desk.
Troubleshooting Common Problems
I can't authenticate. What should I do?
-
Reenter the PIN to ensure you entered it correctly.
If entering the PIN in the app doesn't work, try entering the PIN + OTP in the Passcode field in the protected resource, such as a VPN client, you are trying to access.
-
Use your company's self-service portal to check if your SecurID OTP credential is disabled, locked, or expired. If any of these is the case, contact your IT Help Desk.
-
If you still can't authenticate, contact your IT Help Desk.
I forgot my PIN, or another person has learned my PIN.
You must reset your PIN. Use the self-service console your company provides or other method as instructed by your IT Help Desk.
I'm being prompted to enter the Next Tokencode. What does that mean?
You might occasionally be prompted for a next OTP after you enter your PIN and SecurID OTP. If this happens, do the following:
-
In RSA Authenticator, click Next OTP
 .
. 
-
In the VPN client or application, enter or copy and paste the Next OTP displayed in the app.