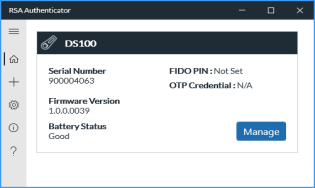
RSA DS100 Hardware Authenticator
The RSA DS100 enables both FIDO2 and one-time password (OTP) authentication. It is a passwordless, multi-functional hardware authenticator that works plugged in or unplugged. It adds an extra layer of security when you sign in to accounts. It is safer than using only a password.
Register Credentials on an RSA DS100 Using the My Page Self-Service Portal
Authenticate Using RSA DS100 OTP Credential to a Web Application
Authenticate Using RSA DS100 OTP Credential to a VPN Application
Manage RSA DS100 and FIDO Security Keys
What You Need to Do
When you receive your RSA DS100, the first thing you need to do is to register via your organization's My Page self-service web portal and add a FIDO credential and/or OTP credential so you can use it to authenticate..
Register Credentials on an RSA DS100 Using the My Page Self-Service Portal
My Page enables you to register a FIDO and OTP credential to the RSA DS100. FIDO credentials are registered completely on My Page and use the web browser, whereas an OTP credential registration starts on My Page, but requires RSA Authenticator app to add the OTP credential.
An RSA DS100 hardware authenticator can hold only one OTP credential. An IT administrator typically sends the URL for My Page to each user. If you need the URL, contact your IT administrator or customer service representative.
To register an OTP credential and FIDO on an RSA DS100:
-
Enter the URL for My Page and log in by following the instructions provided by your administrator.
-
Click My Authenticators, if not already on that panel.
-
Click Register an authenticator.
-
From the Choose an authenticator to register page, select DS100.
-
Follow the on-screen instructions for registering a FIDO credential, if required by the admin.
Note: Setting a FIDO PIN may be required. This PIN is stored in the RSA DS100.
-
After FIDO registration is complete, continue with OTP credential registration on My Page.
-
If the RSA Authenticator app is not already installed, install it from the Microsoft Store.
-
From My Page, click Open RSA Authenticator app.
RSA Authenticator app opens with the details to register the OTP credential pre-entered.
-
Click Submit in the Authenticator app to add the OTP credential.
-
Click Done in the Authenticator app.
-
Return to My Page to set an OTP PIN if required by the administrator.
Note: This is a different PIN than the FIDO PIN. The OTP PIN is stored in the Cloud Authentication Service.
IMPORTANT: If the admin requires setting an OTP PIN, you must set the PIN on My Page. If an OTP PIN is required but not set, every authentication with the RSA DS100 OTP credential will be unsuccessful.
Change the RSA DS100 OTP PIN from My Page
Procedure
-
Log in to My Page.
-
From My Authenticators tab, expand RSA DS100 Hardware Authenticator.
-
Click Change OTP PIN.
-
Enter the current OTP PIN and then enter and confirm the new OTP PIN.
-
Click Submit.
Synchronize OTP
Procedure
-
On My Page, expand RSA DS100 Hardware Authenticator.
-
Click Synchronize OTP.
-
Enter the OTP that appears on the RSA DS100 authenticator.
-
Click Next.
-
Enter the next OTP that appears on the RSA DS100 authenticator.
-
Click Next.
The OTP is successfully synchronized and is ready for use.
Authenticate Using RSA DS100 OTP Credential to a Web Application
Procedure
-
Go directly to the web application where you wish to log in, or go to My Page.
-
Enter username and password.
-
On the Enter OTP screen, enter the OTP PIN.
-
Enter the OTP by doing one of the following:
-
Press the button on the RSA DS100 to display an OTP on the LCD screen then type it in
-
Insert the RSA DS100 in the USB port and press the button to automatically enter the OTP.
Note: The OTP PIN and the OTP are entered in the same field.
-
-
Click Submit.
Authenticate Using RSA DS100 OTP Credential to a VPN Application
Procedure
-
Launch the VPN application.
-
Enter username and password.
-
Enter the OTP PIN.
-
Enter the OTP by doing one of the following:
-
Press the button on the RSA DS100 to display an OTP on the LCD screen then type it in.
-
Insert the RSA DS100 in the USB port and press the button to automatically enter the OTP.
Note: The OTP PIN and the OTP are entered in the same field.
-
-
Click Submit.
Manage RSA DS100 and FIDO Security Keys
View RSA DS100 OTP Credential in SecurID Authenticator App
Procedure
-
From the Home page of RSA Authenticator app, click Manage for an RSA DS100.
-
Click the OTP tab to view the RSA DS1000 OTP credentials.
Change the PIN for RSA DS100 OTP Credential Starting from SecurID Authenticator App
Procedure
-
From the Home page of RSA Authenticator app, click Manage for an RSA DS100.
-
Click the OTP tab to view an RSA DS100 OTP credentials.
-
Select a credential that needs a PIN change.
-
Click the Change PIN (on My Page) link.
-
If not already logged into My Page, follow the authentication prompts to log into My Page.
-
Expand RSA DS100 Hardware Authenticator.
-
Click Change OTP PIN.
-
Enter the current PIN and then enter and confirm the new PIN.
-
Click Submit.
Delete an RSA DS100 OTP Credential
Procedure
-
From the Home page of RSA Authenticator app, click Manage.
-
From the OTP tab, select a credential to be deleted.
-
Click Delete.
-
On the confirmation message, click Delete to confirm.
-
Click Done.
Note: To complete the RSA DS100 OTP credential deletion, delete it from the My Authenticators tab of the My Page portal also.
Set FIDO PIN
You can set a PIN that can contain from 4 to 63 characters.
Procedure
-
From the Home page of RSA Authenticator app, click Manage.
-
From the FIDO tab, click Set PIN.
-
Enter a PIN and then confirm the PIN.
-
Click Set FIDO PIN.
Change FIDO PIN
Remember, the DS100 PIN is applicable for all your RSA DS100 OTP credentials.
Procedure
-
From the Home page of RSA Authenticator app, click Manage.
-
From the FIDO tab, click Change PIN.
-
Enter the current PIN, new PIN, and then confirm the new PIN.
-
Click Change FIDO PIN.
Reset SecurID DS100 to Factory Defaults
Procedure
-
From the Home page of RSA Authenticator app, click Manage.
-
From the FIDO tab, click Reset FIDO.
-
Click Reset.
-
Unplug and then re-insert the RSA DS100 into the USB port.
-
Press the RSA DS100 button when prompted to do so.
Update RSA DS100 Firmware
Before you begin
-
RSA Authenticator 6.1.1 (or later) for Windows and RSA FIDO Management Service must be installed.
-
Your computer must have a USB-C port (also works through a third-party USB-C to USB-A adapter).
-
The RSA DS100 firmware update file must be available on the computer's local file system (file extension ends with '.cyacd2').
Procedure
-
If the firmware update is in a compressed .ZIP file, extract the file.
-
Launch the RSA Authenticator app and insert the RSA DS100 in the USB port.
-
On the Home page, click Manage.
-
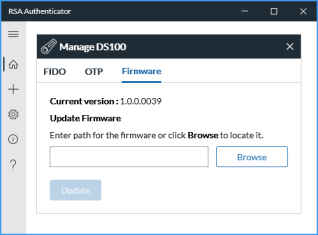
On the Firmware tab, do one of the following:
-
Enter the file path to the firmware file.
-
Click Browse to locate and select the firmware file.
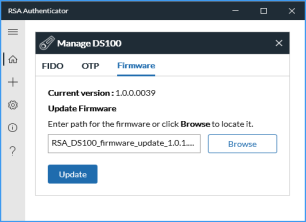
-
-
Click Update. The update may take up to 60 seconds.
Note: Do not remove your RSA DS100 until the update is completed. After the update, RSA DS100 reboots automatically to apply the new firmware version. If the RSA DS100 is unplugged while rebooting (the LCD screen is blank), it can permanently damage the RSA DS100.
If the firmware update is performed using a Virtual Machine (VM), the RSA DS100 is disconnected during the reboot. If it is not quickly connected back to the VM after reboot, RSA Authenticator may incorrectly display an error message that the firmware update failed.
Try removing the DS100 from the USB port for 5 to 10 seconds, and then insert it back. If the expected new firmware version is not displayed on the RSA Authenticator Home screen, try performing the firmware update again.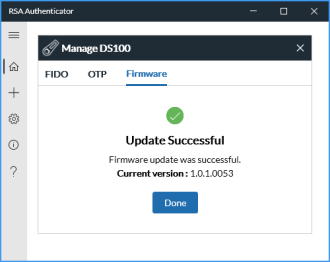
-
When the update is successful, click Done.
The Firmware Version field displays the new version.